
Welcome to the world of 3D sculpting, where art and tech come together. We’ll explore how sculpting has evolved, from clay modeling to creating digital creatures. We’ll look at tools, techniques, and new ways to model digitally. Our goal is to give you the skills to unleash your creativity.
Key Takeaways
- Understanding the historical roots of 3D sculpting enhances creativity.
- Clay modeling techniques form the foundation for digital sculpting skills.
- ZBrush and Blender are essential tools for modern 3D modeling.
- Digital creatures require both technical skill and artistic vision.
- Innovative practices in 3D sculpting continually reshape the art form.
- Practice and feedback are key to improving your skills.
Introduction to 3D Sculpting
3D sculpting combines art and technology, letting creators make detailed three-dimensional models. It’s used in digital art, film, and video games. We’re starting by looking at the basics of 3D sculpting.
Exploring 3D sculpting shows how important technology is. Old sculpting ways were hard work. But now, digital tools make it easier and open up new possibilities in art.
Learning about 3D sculpting gives us a solid base. It helps us understand the many techniques and tools artists use. This knowledge is key as we dive deeper into its history and growth.

The History of 3D Sculpting
Sculpting has a long history, dating back thousands of years. Ancient civilizations made amazing figures from clay and stone. This journey shows how sculpting has changed from old methods to today’s complex techniques.
Early societies like the Mesopotamians and Egyptians used clay to create artifacts. These works showed their culture and beliefs. As time went on, artists started using marble and bronze, making incredible pieces that people love today.
The industrial revolution brought new tools and ways to sculpt. Later, technology changed sculpting even more. Computer graphics allowed artists to make detailed designs and explore new digital possibilities.
Tools like ZBrush came along, changing how sculpting is done. Learning about 3D sculpting’s history helps us understand and inspires us to be creative.

Understanding Traditional Clay Modeling
Traditional clay modeling is a world of creativity and touch. It lets artists use their hands and tools to create. We’ll explore the tools, materials, and techniques needed to master this art.
Tools and Materials for Clay Sculpting
Choosing the right tools and materials is key to clay modeling success. Here are the essential sculpting tools and clay types we recommend:
| Type of Tool | Purpose |
|---|---|
| Wire Cutters | Used for cutting clay blocks and shaping quickly. |
| Loop Tools | Perfect for carving and refining details. |
| Modeling Pins | Maintain the structure and form during the sculpting process. |
Artists can choose between oil-based or water-based clay. Oil-based clay doesn’t dry out, giving more time to sculpt. Water-based clay can be molded and fired into finished pieces. Each clay type has its own properties, and sculptors should choose based on their project.
Basic Techniques and Processes
Mastering clay modeling involves learning various techniques. Here are some basic methods:
- Pinching: Forming shapes by pinching the clay between fingers.
- Coiling: Building up forms using rolled strips of clay.
- Slab-Building: Constructing objects by assembling flat slabs of clay.
As we sculpt, it’s important to understand drying, firing, and finishing techniques. These steps help our sculptures stay strong and look great. A successful piece shows the artist’s vision through technique and material choice, highlighting the beauty of traditional clay modeling.
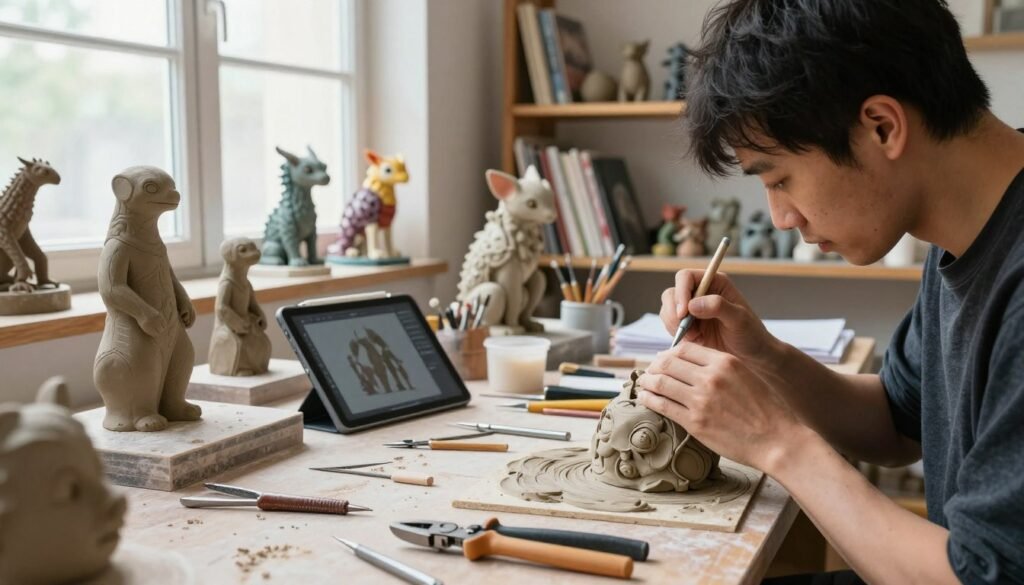
Transitioning from Clay to Digital Sculpting
The move from clay to digital sculpting is a thrilling change in art. Digital tools offer many benefits, like better precision. This lets artists add details that clay can’t match.
These tools also make editing easier. Artists can keep tweaking their work without worrying about physical limits. This opens up new ways to play with textures and animations.
Artists who know clay can easily use their skills in digital art. The core ideas of shape and beauty stay the same. This shift brings new creativity, blending old and new techniques.

The Role of ZBrush in Digital Sculpting
ZBrush is a top choice for digital sculpting. It offers a mix of detailed design and easy-to-use interface. Artists in gaming and film love ZBrush for its cool features. These features help us make amazing, detailed models.
Key Features of ZBrush for Creators
ZBrush has features that boost creativity and make work easier. Dynamic subdivision lets us work on high-res meshes without heavy computing. Polygroups help manage complex models, so we can focus on details.
Brush customization in ZBrush lets us get creative. We can make tools fit our unique style. Plus, ZSpheres and DynaMesh help with quick prototyping and editing. The Clip Curve tool is great for precise cuts, making sculpting smoother.
Getting Started with ZBrush
Starting with ZBrush is fun, even if you’re new to digital sculpting. The setup is easy, so we can dive in fast. The interface is easy to navigate, with a clear layout.
To start, pick basic shapes from the tool palette. This is the first step to exploring different brushes and techniques. By practicing, we can master ZBrush’s amazing features.

Exploring Blender Sculpt Mode
Blender sculpt mode is a game-changer in digital sculpting. It’s loved by both new and seasoned 3D modeling artists. Its open-source status means it’s affordable without losing quality. This part will cover Blender’s top features and guide you through its easy workflow to make amazing models.
Why Choose Blender for 3D Sculpting?
Blender stands out in many ways, making sculpting better. It’s flexible, allowing for smooth design changes. Here are some reasons to pick Blender:
- Powerful Brush System: Blender’s sculpting brushes are strong, flexible, and can be tailored. They help create detailed 3D models.
- Cost-Effectiveness: As an open-source tool, Blender saves you money. It’s free from the cost of commercial software.
- Community Support: A big community offers lots of help, tutorials, and plugins. This makes sculpting easier.
Basic Workflow in Blender Sculpt Mode
Starting with Blender sculpt mode is easy. It has a simple workflow to boost your productivity. Here’s how to get started:
- Setup a New Project: Open Blender and start a new project. Choose or import a base mesh.
- Access Sculpt Mode: Move from Object Mode to Sculpt Mode from the top-left menu.
- Adjust Brush Settings: Check the properties panel to pick and tweak brushes for your needs.
- Utilize Symmetry: Turn on symmetry settings for even modeling on both sides of your object.
- Refine Your Model: Use different brushes to shape, add details, and polish your sculpture. This ensures a great finish.

Learning Blender’s tools and features unlocks digital sculpting’s full power. It’s perfect for both simple and complex designs. Blender sculpt mode is a creative space for every artist.
Techniques for Effective Digital Modeling
To excel in digital sculpting, we must learn effective digital modeling techniques. This includes using polygroups and subdivision. These tools improve our workflow and allow for more precise sculpting of complex models. Understanding these basics is key to optimizing our creative process and achieving top results.
Understanding Polygroups and Subdivision
Polygroups are vital in digital modeling, helping us manage complex designs efficiently. They let us assign colors or identifiers to model areas for focused detailing or changes. This is super helpful in detailed projects where fine adjustments are needed.
Subdivision surfaces also play a big role. They let us smoothly refine our models as we work on their features. This keeps our designs high-resolution and flexible for detailed sculpting.
Mastering Brushes and Strokes
In digital sculpting, the right brushes are key to creating dynamic textures. Each brush type has its own strengths—some for soft forms, others for sharp details. Getting to know these brushes in sculpting software expands our creative options.
Learning to use strokes well boosts our sculpting speed and quality. It lets us create complex forms that take our projects to the next level. Trying out different tools can lead to new and exciting results.

Creature Design: Bringing Ideas to Life
Engaging in creature design is exciting for artists. It lets them mix creativity with technical skills. They turn ideas into real designs, exploring new ways to design.
Conceptualizing Creatures Before Sculpting
First, artists think about their creatures. This is key for all design choices. Sketches help see ideas and talk about stories and characters.
Mood boards inspire and keep focus on main ideas. This makes the creative process better.
Designing Anatomy and Texture
Knowing anatomy is key for believable creatures. Artists must mix real anatomy with their own ideas. This makes creatures connect with people.
Texture shows a creature’s personality and feelings. Looking at real materials helps artists make designs feel real.

| Design Element | Description | Impact |
|---|---|---|
| Anatomy | Structuring the creature’s body parts realistically | Enhances believability |
| Texture | Applying surface details and materials | Conveys emotion and character |
| Concept Development | Initial sketches and mood boards | Guides design direction |
By using these elements, artists can make their designs better. This approach makes stories come alive, blending tech with art.
Texturing and Painting Your Sculptures
Creating 3D sculptures is more than just shaping them. Texturing and painting are key to bringing them to life. Techniques like UV mapping help artists get their models ready for detailed work. Tools like Substance Painter and Mudbox let artists paint directly on the model, adding real-life textures.
Adding textures makes the sculpture come alive. For example, textures like leather or fabric can make the sculpture feel more real. The colors used also play a big role. Warm colors can make the sculpture feel exciting, while cool colors can make it feel calm.

Layering techniques add depth to both texturing and painting. This means adding multiple layers of texture to make the surface more detailed. Each layer can add more details, making the sculpture look more sophisticated.
In short, learning to texture and paint your sculptures opens up a world of possibilities. It not only improves your skills but also helps you connect with your audience in a deeper way.
Rendering and Presenting Your Work
In our journey through 3D sculpting, rendering is key. It turns our digital models into stunning visuals. By using different rendering techniques, we can make our 3D models pop in portfolios and exhibitions. Let’s dive into what makes high-quality renders and how to get them.
Techniques for High-Quality Renders
Creating amazing renders takes both art and tech skills. Here are some important steps:
- Lighting: The right lighting can change how our models look and feel. Try out different lights to get the perfect mood.
- Camera Positioning: Where we place the camera can change how deep and interesting our models seem. Pick angles that show off the best parts.
- Post-Processing: Tools like Adobe Photoshop can make our renders even better. Use them for color tweaks, sharpening, and cool effects.
Remember to keep tweaking and improving based on what others say and how it looks. Every little change can make a big difference in creating eye-catching, high-quality renders.
Common Mistakes in 3D Sculpting
Learning any new skill comes with its own set of challenges. Aspiring sculptors often stumble upon common mistakes that can mess up their workflow and final results. It’s key to know these 3D sculpting errors to improve and get better results. Mistakes like poor topology, wrong scale, and not paying attention to details can really hinder progress.
Fixing these issues with the right troubleshooting techniques can help you grow. For example, keeping your geometry clean helps with animation and texture mapping. Making sure your design is the right size is important for both looks and function. Regularly checking your work and being open to feedback helps spot these common mistakes.
| Common Mistake | Description | Troubleshooting Technique |
|---|---|---|
| Poor Topology | Inefficient geometry that complicates animation. | Use edge loops and avoid n-gons. |
| Ignoring Scale | Inconsistent proportions across models. | Establish a scale reference from the start. |
| Overlooked Details | Lack of nuance results in flat models. | Focus on small features and textures. |
| Inadequate Polygroups | Poor organization of model components. | Create clear polygroups for different areas. |
By spotting these common mistakes and using the right troubleshooting methods, we can improve our sculpting skills. This way, we can move forward with more confidence and skill.
Tips for Improving Your 3D Sculpting Skills
Mastering 3D sculpting takes dedication and the right approach. A structured practice routine helps improve skills consistently. It also lets you try out different techniques.
Regular sculpting sessions boost your understanding of form, texture, and proportion. These are key for artist development.
Practicing Regularly and Seeking Feedback
Having a regular sculpting schedule is key. It helps us refine our techniques and explore new limits. Getting feedback from peers or mentors is also important.
Open discussions about our work help us learn and adapt. This is critical in the changing world of 3D sculpting. Honest feedback shows us our strengths and what we need to work on.
Exploring Online Resources and Tutorials
The digital age has made learning 3D sculpting easy. Many platforms offer tutorials for all skill levels. YouTube, Skillshare, and sculpting forums have a wide range of content.
Using these resources helps us keep improving. We can learn new strategies and stay up-to-date with trends. Together, we can make learning a shared experience.
The Future of 3D Sculpting: Trends and Innovations
The world of 3D sculpting is changing fast. New technologies are leading the way. One big change is using virtual reality (VR) to sculpt. This lets artists work in a virtual space, making their work more precise and creative.
Artificial intelligence (AI) is also playing a big role. AI helps artists by understanding their style and suggesting new ideas. It makes the creative process smoother and more connected to human creativity.
New software is also changing how we create art. These programs use machine learning to help artists. They make the creative process more flexible and open to new ideas.
By embracing these new trends, artists can use today’s technology to its fullest. We’re on the edge of a new era where art and technology come together. The future of 3D sculpting looks incredibly exciting.
Conclusion
As we conclude our deep dive into 3D sculpting, it’s time to reflect on what we’ve learned. This summary covers the techniques and tools we’ve explored. From traditional clay to digital platforms, we’ve seen it all. It’s clear that skill and imagination are key in this field.
Every sculptor’s journey is unique, filled with chances to keep learning. Innovation is at the heart of our work. We must keep improving and using new tech like ZBrush and Blender to grow.
Our growth comes from both our skills and how we handle challenges. This dedication leads to beautiful art that shows our passion and understanding. We urge all creators to use what we’ve shared to keep exploring.
By embracing change and learning, we can all start exciting 3D sculpting journeys. Let’s use our experiences to motivate each other. Together, we can build a community that values innovation and creativity.